How-to guide

How to inject intramuscularly.

An intramuscular (IM) shot delivers the dose deep into a large muscle. It uses a longer needle and a different technique than a subq shot, here is how to do it cleanly and comfortably.

Intermediate6 minute readZ-track method

Read first. This is general educational information, not medical advice, and the peptides referenced on this site are sold strictly for research use only. IM injections go deeper than subq, if you're unsure about landmarks, have a licensed provider show you in person first.
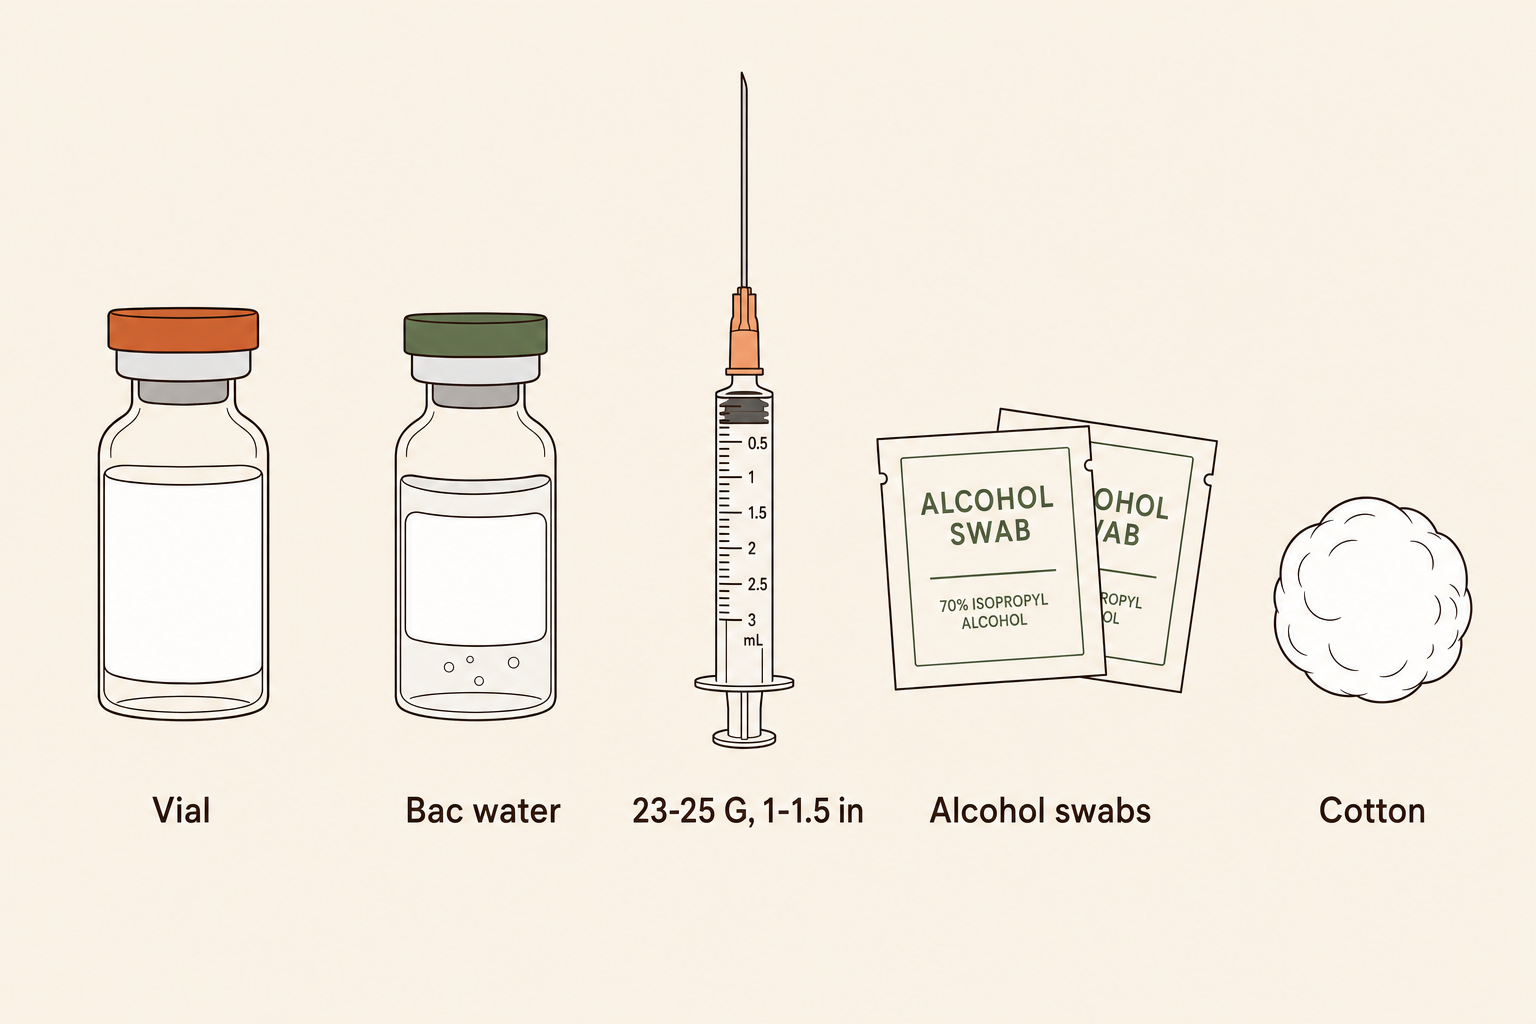
Intramuscular injection supplies: vial, longer-gauge syringe, alcohol pads, sharps container

IM needles are longer than subq needles so they reach the muscle. Keep everything sterile.

Step 1 · Gather

What you'll need.

IM shots use a longer, slightly thicker needle than subq. Lay everything out and wash your hands before you handle any of it.

  • Your reconstituted vial
  • A syringe with a 22–25 gauge, 1 to 1.5 inch needle
  • Alcohol prep pads
  • A sharps container
  • Optional: a separate drawing needle to keep the injecting needle sharp
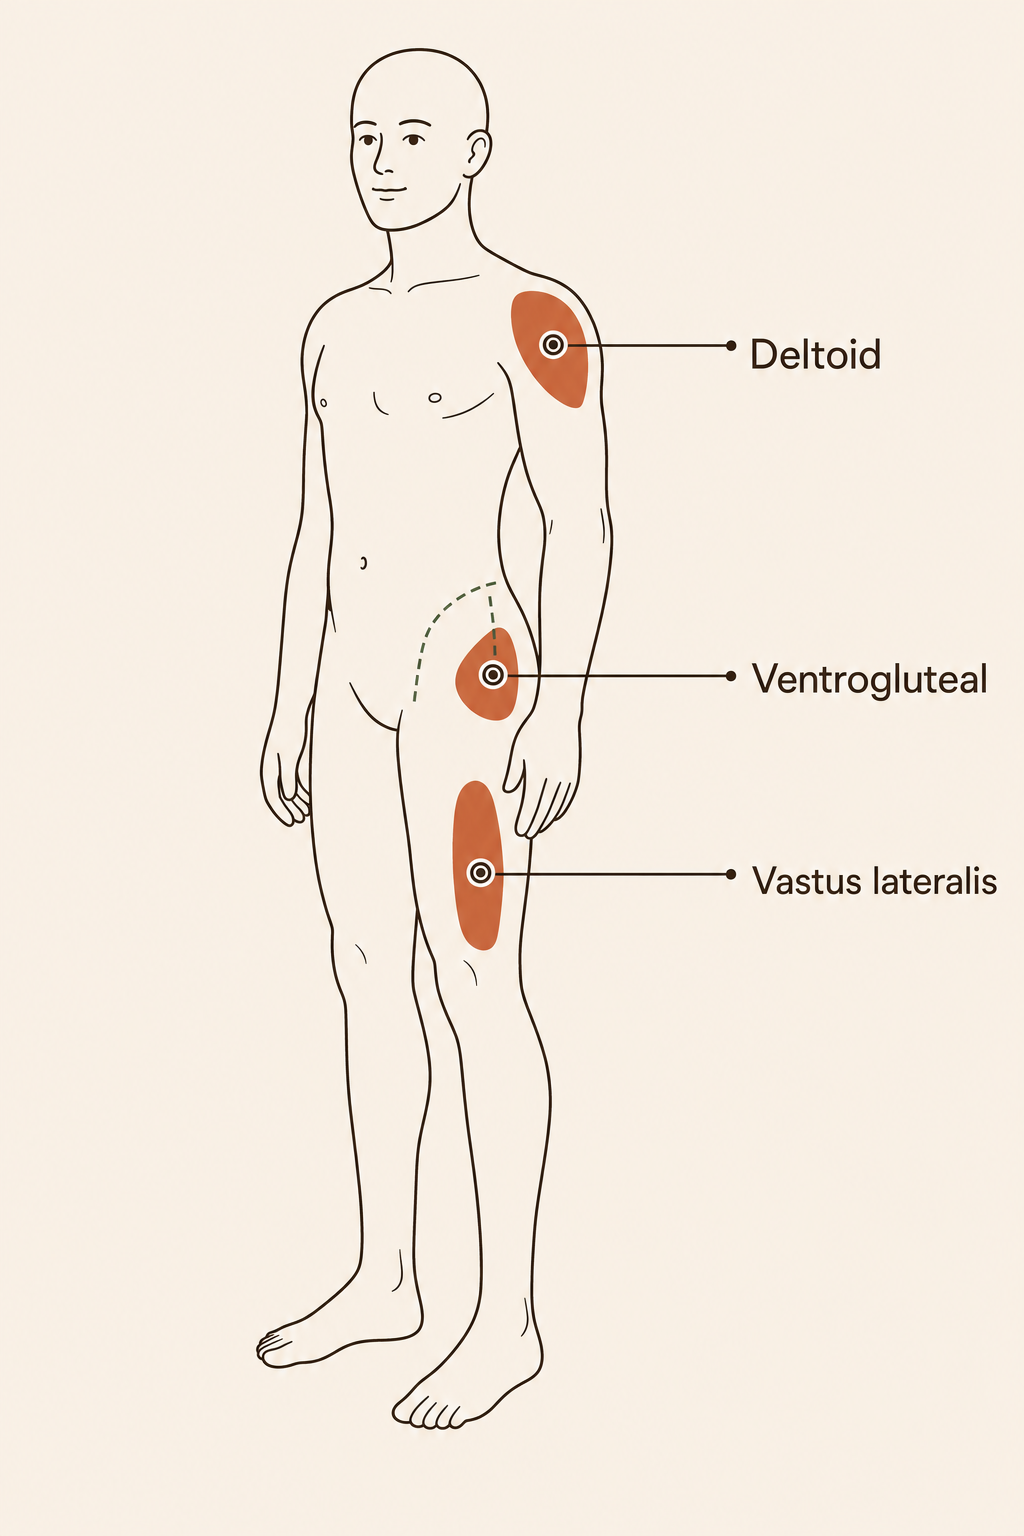
Body diagram showing intramuscular sites: deltoid, ventrogluteal, vastus lateralis

The three IM sites. The hip (ventrogluteal) is the safest for larger volumes.

Step 2 · Where

Find the muscle.

Three muscles are used for self-injection. Landmarking correctly is what keeps the shot safe, it keeps the needle away from nerves and vessels.

  • Deltoid (shoulder): easiest to reach, best for small volumes
  • Ventrogluteal (hip): the safest large-volume site
  • Vastus lateralis (outer thigh): easy to self-administer

Rotate between sites and sides so no single muscle gets overworked or sore.
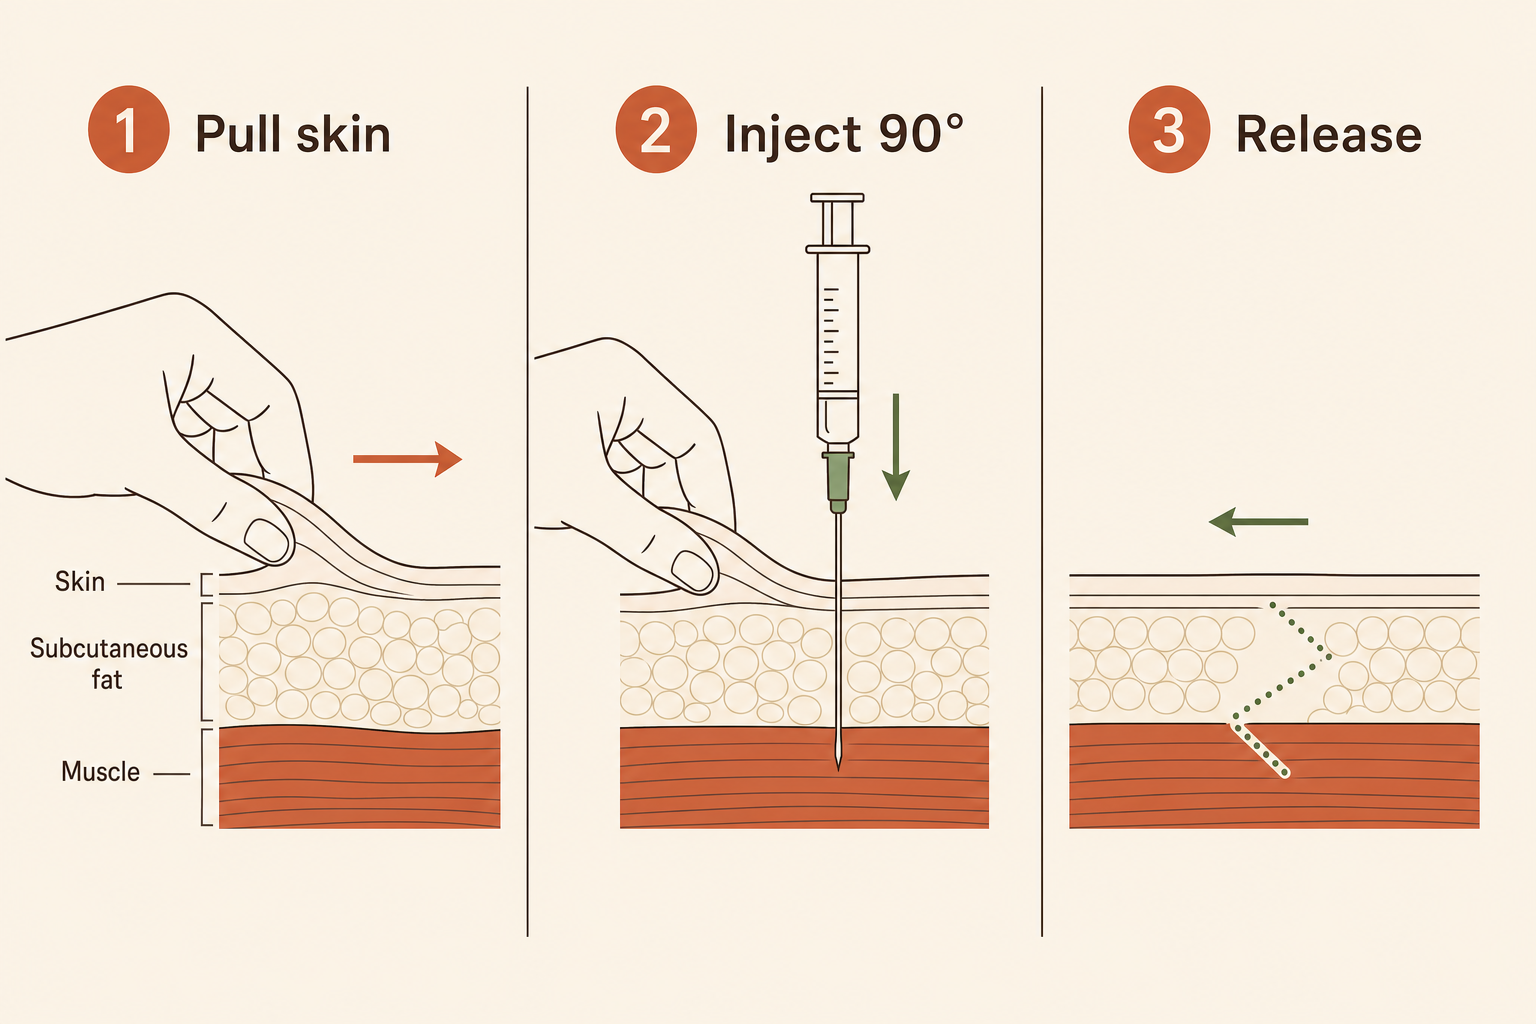
Illustration of the Z-track technique, skin pulled to one side before injection

Holding the skin off to the side seals the dose inside the muscle when you let go.

Step 3 · Z-track

Set the Z-track.

The Z-track method stops the solution from leaking back out through the needle path. With your non-dominant hand, pull the skin and fat about an inch to one side and hold it there.

  • Swab the site and let it dry
  • Pull the skin ~1 inch to the side and hold
  • Keep that tension through the whole injection
  • Release only after the needle is out, which seals the path
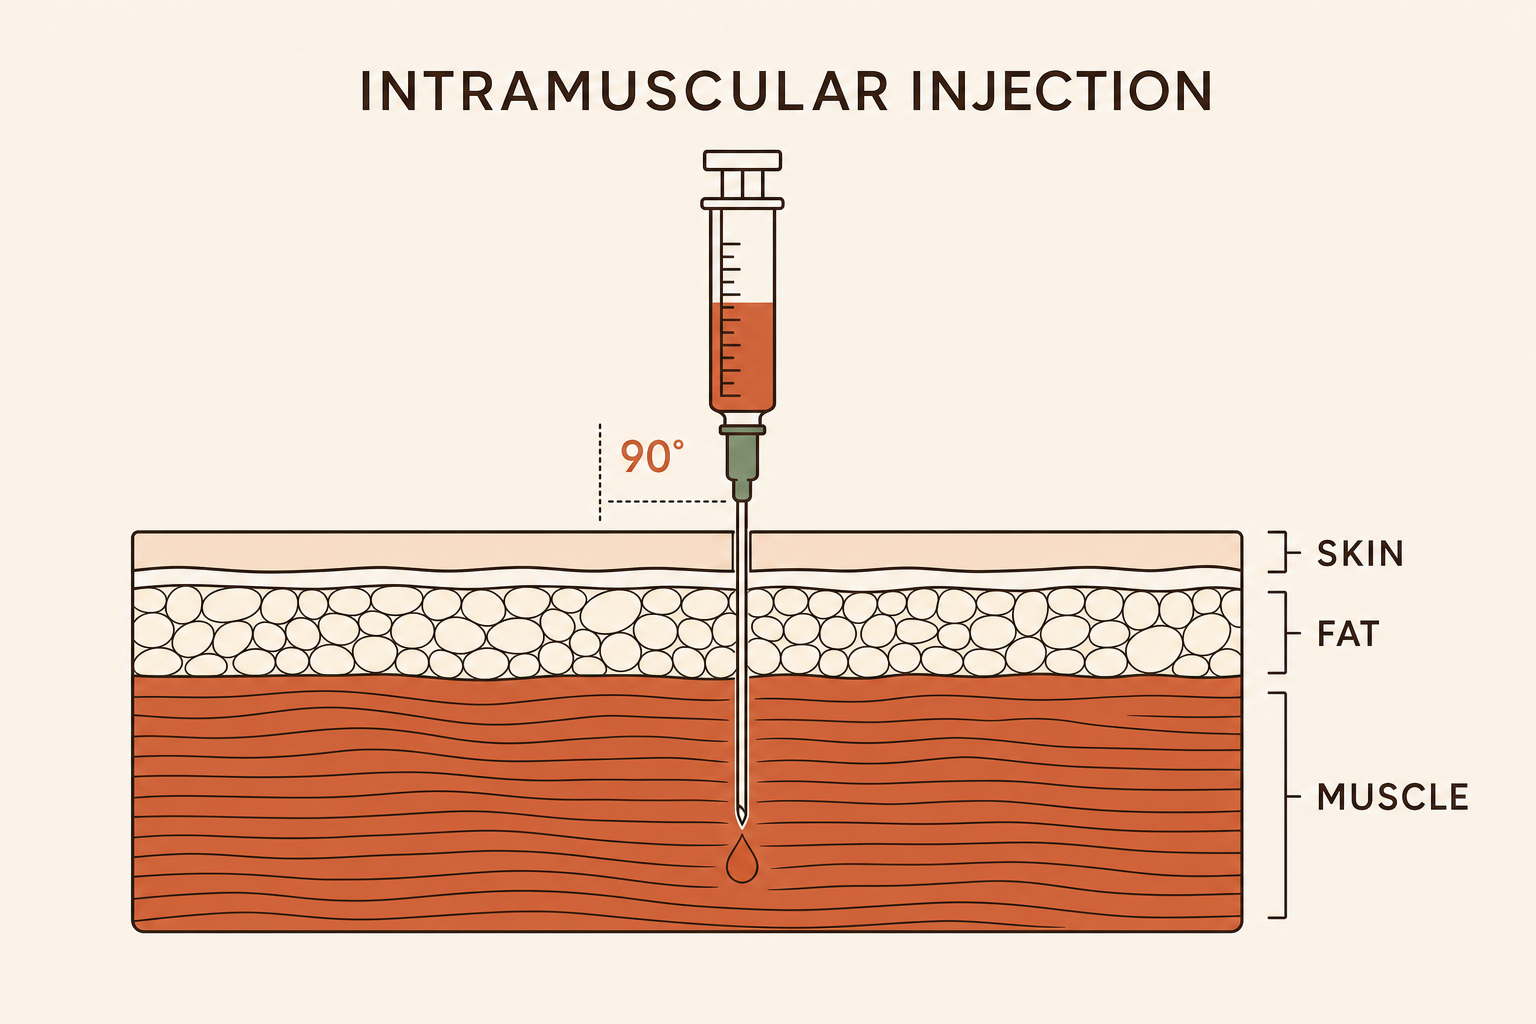
Cross-section showing a needle entering muscle at 90 degrees, below the fat layer

At 90°, the needle passes through skin and fat into the muscle below. Aspirate before you inject.

Step 4 · Inject

Insert, aspirate, inject.

Insert the needle straight in at 90 degrees in one firm, smooth motion. Pull back briefly on the plunger to aspirate, if no blood appears, inject slowly. If blood appears, withdraw and start fresh.

  1. Insert at a 90° angle in one smooth move
  2. Aspirate, pull back gently and watch for blood
  3. No blood? Inject slowly and steadily
  4. Withdraw, release the skin, apply gentle pressure
Step 5 · Aftercare

Clean up safely.

Drop the whole used syringe straight into your sharps container, never recap it and never bin it with household trash. A little soreness in the muscle for a day is normal; gentle movement helps.

Return your vial to the fridge. If a site stays red, hot, or swollen for more than a couple of days, contact a healthcare provider.

Common questions.

Why aspirate for IM but not subq?

IM sites sit near larger blood vessels, so pulling back to confirm you're not in a vein adds a margin of safety. The shallow fat layer used for subq doesn't carry the same risk.

Which site should a beginner start with?

The vastus lateralis (outer thigh) is the easiest to see and reach on yourself. The ventrogluteal (hip) is the safest overall but is harder to landmark solo at first.

What does the Z-track actually do?

Offsetting the skin before you inject means the needle track zig-zags shut when you release, trapping the dose in the muscle and reducing leakage and irritation.

How deep does the needle go?

All the way to the hub for most adults at the hip and thigh, that's what a 1 to 1.5 inch needle is sized for. The deltoid takes a shorter needle and smaller volumes.

Just to be clear.

This site is for educational and informational purposes only and is not medical advice. Nothing here is intended to diagnose, treat, cure, or prevent any disease, and none of these statements have been evaluated by the FDA or any regulatory authority. Talk to a licensed healthcare provider before starting anything.

Peptides and other compounds referenced on this site are sold by third-party vendors strictly as research chemicals for laboratory and research use only. They are not drugs, dietary supplements, cosmetics, or products intended to diagnose, treat, cure, or be consumed by humans or animals, and nothing here is an offer to sell or any encouragement to use them in any such way. You must be at least 18 years old, and of legal age in your jurisdiction, to use this site. Clearly Peptides does not manufacture, sell, supply, or ship any peptides or compounds.

Lab data, grades, and prices are aggregated from publicly available third-party sources, primarily the Janoshik public database and finnrick, plus community-submitted reports. We don't run labs or test anything ourselves. We present this public information, credit each source, and link back to the original report so you can read it yourself. Listing a vendor or compound is not an endorsement.

Clearly Peptides participates in affiliate programs and may earn a commission when you buy through a link or code on this site, at no extra cost to you.

Clearly Peptides is not liable for any actions you take based on the information provided here. Your use of this site is subject to our Terms of Use.